We immediately begin to retouch your photos after the payment. Retouching time depends on the quantity and complexity of the order. Minimum time for one photo is 15 min. Since we have many photo editors, we retouch 90% of photos within 24 hours. Free revisions provided for your photos up to 7 days after receiving the finished photos submit a request for your order and we will edit your pictures until you are satisfied Up to 40% OFF Competetive pricing system, as prices decreases automatically up to 40% OFF every time you order depending on the amount of your work. Wedding Photo Retouching Service: A wedding is a significant life event for everybody. So, the photos of such an event are anticipated to be gorgeous and glamorous. You may need additional retouching and photo editing to make your memories stand out. Wedding photo editing is a significant part of wedding photography businesses.

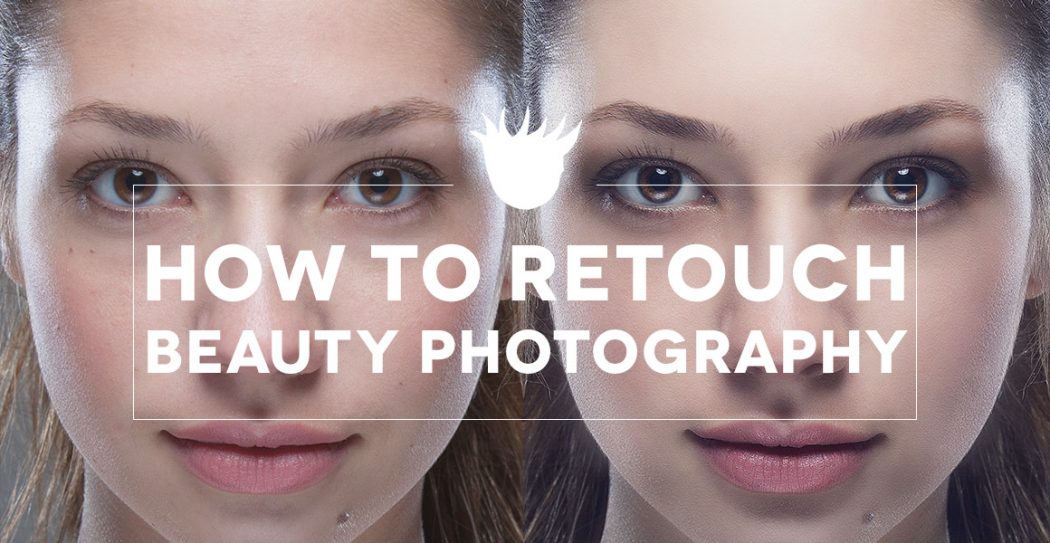
Don’t know how to make a perfect glamour post-production? These portrait retouching tips to upgrade your skills in glamour retouching.
The answer is simple: instinctively you will like the person who looks natural. Here the following questions arise, what do we see on the Facebook pages, in the magazines and TV - Natural or retouched beauty? Automatically, we mark two basic objects: smooth, fair skin, its healthy equal color, and probably the most important feature is the expression and clear eyes.
The key-element is the skin
As the present level of the photo-equipment characteristics gets higher and higher, it is simple to distinguish the skin’s microstructure in the photos: very small pores, wrinkles and hairs on a face. All of these add a great quality to pictures, but it is also a problem for the editor.
It means, that on a photo a large amount of imperfections, defects and flaws will be manufactured, that’s why it’s too hard to overcome them without having experience. Skin retouching which doesn’t destroy the artistic feeling and the high-quality color correction is what is necessary here.
A pretty good crowd of photographers not good at removing blemishes on a portrait, go along a standard route — cover the skin using blurring tools. Honestly speaking, this process has nothing similar with professional retouching. The qualified retouchers and professional digital artists categorically don't work with this instrument and don't use filters which destroy the texture.

The general retouching is carried out approximately, with the feeling of a measure, great attention to the details and by paying attention to the main characteristics of the model’s face in a picture. We recommend doing the editing step by step at full oncoming, where the smallest flaws are visible, and in order to correct light, dark and color stains and imperfections which prevent seeing the volume and lines in a level photo.
Healing Brush Tool & Clone Stamp

If the skin has bigger blemishes like scars, zits or birthmarks, then, firstly, it is better to get rid of them. To cope with it the Healing Brush is ready to help.
Healing Brush is the tool for filling of the area in the shot by an advanced, defined cloning source. It’s an important feature and the difference is that the Healing Brush Tool doesn’t just copy a certain area, but it also considers some of the parameters of a source: color, brightness, and lightning conditions and texture.
At this stage you may also use the Clone Stamp tool which retouches only the details similar to the Healing Brush tool. However, the Clone Stamp has one peculiarity: you can change opacity of a stamp and that can't be done with Healing Brush. The more time you spend editing the skin blemishes, the better and more natural your photo will look. If you are going to be called a professional glamour retoucher, you should pay as much attention to this stage as you can.
Eyes are the center of attention
Generally, eyes retouching consists of the clearing up the excess veins and the redness on the eyeball, strengthening of the make-up and the density of eyelashes, and also fixing the shade of an eye’s iris saturation. If you want to attract the viewer’s attention to your model’s eyes more, add in some contrast, and increase the brightness of the pupils, but don’t abuse photo color correction of the white of the eye: the colorless eyeballs will show the exact work with Photoshop tools which causes some unpleasant feedback.
Retouching Your Photos Pictures

Face colors
Let’s talk about the shades of face retouching now. In life they are very difficult to distinguish, but you can see them perfectly in the image. They appear because of the circulation of blood inhomogeneity, and, besides, because of the diverse light reflections from colorful clothes which in their turn, paint the skin in unnatural colors.
For the successful and high-quality color correction all color transitions on a face should be allocated, and also do the same with the separate spots of the one color. After that, being guided by the numbers of RGB channels, correct the skin shades on different parts of the person’s body, and also, don’t forget about the difference between the light and shadow zones in moderation.
One of the most important things is not to forget about the bright flares of light, the shooting conditions and other peculiarities, as each part of the skin has to have its own, unique shade and color.
Having painted the face in one color, you end up with a clay mask instead of a face, and the model will seem artificial. Read about this and other retouching mistakes and how to avoid them at in our previous blog post.

Color correction is the basis of the retouching process
To finish the glamour retouching and receive an eye candy portrait of the person, it is necessary to estimate what volumes and face zones create the temperament of your model’s appearance, which ones should be singled out by the clear-obscure, and which zones should be hidden in the shadow. Your last stage of glamour post-processing should be the portrait stylization by means of color correction — giving slightly unnatural, but fascinating art shades to personify the light and dark parts of a photo.
Retouching Your Photos Albums
Fixthephoto has gathered some tools which may help you with light and color editing:
1. Gradient Map - automatically creates the pleasant gradients in the photo, dividing shadows and flares. In this correcting layer there are ready presets, but you may make your own. It works better if you use all of the settings in the Blending Mode - Soft Light or Screen. You can also play with transparency of the layer to achieve a natural effect.
2. Photo filter – is a correcting layer in which there are diverse auto settings. Do experiments and be composed so that your viewer will appreciate your work, all of them are produced by professional editors.
3. Selective Color - allows retouching the defining color of the shot. For example, if Magenta obviously prevails in the photo, you can slightly muffle exactly this shade.
4. Black & White. If to use this layer with 10 - 20% of clarity, you will gain a quite interesting and noble effect. See these retouching examples at to understand how it works. It is better to use it, especially if there are too many bold and bright colors in the images, especially when Magenta and Yellow prevail.
Retouching Your Photos Youtube
The main task for the retoucher in such types of photo post production services is not to paint a face, but to edit the defects, as it is important to give the face a healthy look and to correct the results of bad lighting.